


Click on Read More
RFID based Door Access or Security Control System

RFID based Door Access or Security
Control System
A
radio-frequency identification (RFID) based access-control or Security control system allows only authorised people to enter a particular zone of an office or
building. Authorised people are provided with unique tags, using which they can
access that particular area. This project is based on RFID, STM32f103C8 ARM
Cortex-M3 development board, a 16x02 LCD module for displaying the status and a
relay or servo motor for opening the door. Fig.1 depicts the block diagram RFID based Door Access or Security Control System.
Block Diagram

Working
Now let’s see how our
RFID reader and ARM Cortex-M3 controller will make Door Access control system.
The basic working principle is very simple. When we place relevant RFID card
near the MIFARE 13.52 MHz, the controller will read the data via SPI (Serial Peripheral
Interface). If any card that match with the existing stored card in the code
access will provided otherwise access denied. LCD 16x02 will display the all
the messages like Swipe your card, Access Granted etc. Every time when user
show his card the buzzer sounds.
Software and IDE’s used in the Project
C- Language, Keil
MDK ARM V5, Atollic TrueStudio for STM32
Components List
1
|
STM32F103 Dev Board
|
2
|
LCD 16x02
|
3
|
MIFARE 13.52
MHz RF ID Reader
|
4
|
Servo/ Realy
|
5
|
Buzzer
|
6
|
ST-Link V2
Programmer
|
Getting Started With STM32 BluePill Part - Installation

In this Tutorial we are going to prepare our Arduino IDE to program
STM32F103 using Arduino IDE.
Step 1: If you have not installed the Arduino IDE in your Laptop/PC
please download and install the Arduino IDE by clicking the
following link.
Please Click
Here to Download Install Arduino IDE.
Note: Make sure to download your
Corresponding OS software.
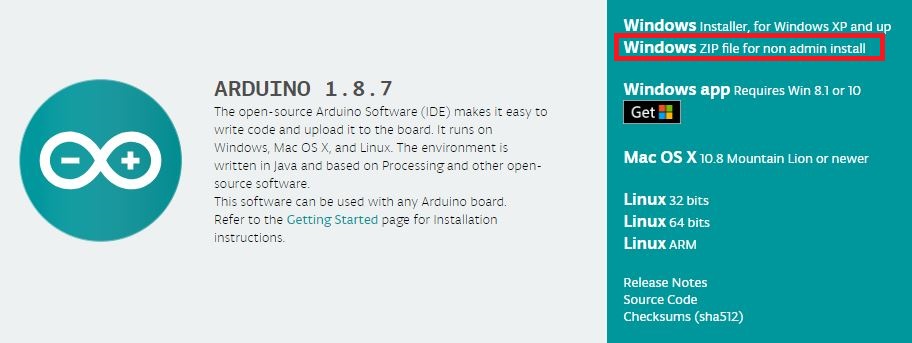
Step2: Extract Download ZIP file into your local C drive i.e. C:\
Step3: Open the folder and double click on Arduino.exe and you would see
window as shown.
Step4: After the Arduino IDE open and download the required packages for
the STM32 board. This can be done by selecting
File -> Preferences.

Step5: Clicking on Preferences will open the below shown dialog box. In
the additional Boards Manager URL text box paste the below link.
and press OK.

Step6: Now go to Tool -> Boards -> Board Manager. This
will open the Boards manager dialog box, search for “STM32F1” and install the
package that appears.
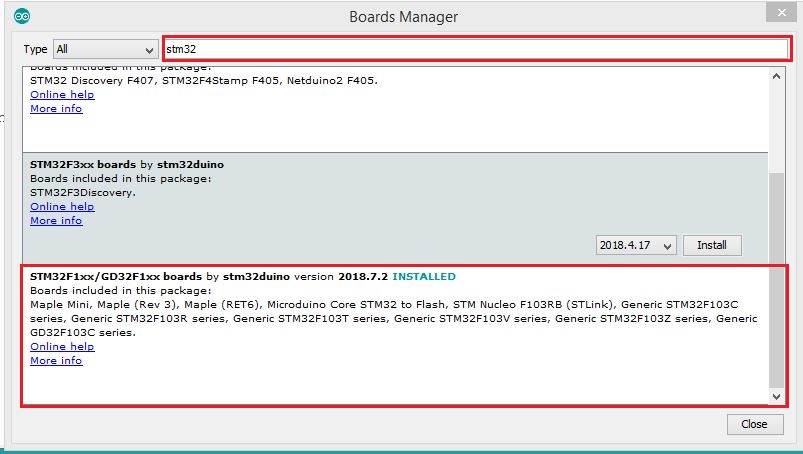
Step7: After Installation “STM32F1” package the Board Manager should
like as shown.

Step8: After the package, installation is completed. Go to Tools and
scroll down to find the Generic STM32F103C series as shown below. Then make
sure the variant is 64kFlah type, CPU speed is 72MHz and change the upload
method to ST-Link.

Finally, we have completed the installation process. So we will
see how to Blink on Board LED which is basically Hello World! programme.
Getting Started With STM32 BluePill Part - Introduction

So Let's get started............................................
The BluePill Module
is very powerful and low cost development board. The Features are Listed in the
below one by one.
1. STM32F103 Core Features
o ARM 32-bit Cortex-M3 Core
o 72 MHz maximum Frequency
o 64 or 128 KB of Flash Memory
o 20 KB SRAM
2. Low Power
o Sleep, Stop and Standby Modes
o VBAT supply for RTC and Backup
Registers
3. Temperature Sensor On Board
4. SysTick 24-bit Down Counter
5. 7- Channel DMA Controller
6. Peripheral Supported : ADC, SPI, I2C,
UART and Timers.
7. CAN
8. USB 2.0 Full Speed Interface
9. CRC Engine
10. 2 Watchdog Timers (Independent and
Window)
Let's look at the
differences between Arduino Uno and STM32F103C8T6 BluePill
Board
|
Arduino
Uno
|
STM32
BluePill
|
Core
|
ATMEL
|
ARM
Cortex-M3
|
Architecture
|
8
Bit
|
32
Bit
|
CPU
Frequency
|
16
MHz
|
72
MHz
|
Flash
Memory
|
32
KB
|
64
or 128 KB
|
SRAM
|
2
KB
|
20
KB
|
GPIO
Pins
|
14
|
37
|
Peripherals
|
UART,
I2C , SPI
|
UART,
CRC, I2C, SPI, CAN, RTC, USB 2.0
|
ADC
Pins
|
6
|
10
|
So by observing the above table, the STM32F103 BluePill is more powerful than compared to Arduino Uno.


